Showing posts with label Merry. Show all posts

Monday, December 10, 2012

How to make: Fabric Cutout Christmas Cards

Hey guys!  How is everyone enjoying the Holiday season? I've been doing all sorts of awesome holiday things around the city the past couple weeks!  I'm finally finished my Christmas cards, and I decided to try one more style for you guys.  All you need is some fabric that you may have lying around, a pattern for the shape, and some card-stock for the cards!  (And glue)  You can either find a pattern you like on the internet or use cookie cutters, like I did.  

Spoiler alert, here's the final product:


I started with a snow man:
Mark the shape with a fabric pencil...


 Or in my case a sharpie.  And make sure you don't mark up your cookie cutter like I did.  WHOOPS!

Cut out your shape...


Glue it to the front of the cards...


And voila!  One ugly snowman card!  Hmm, let's see if we can do better.


Yess, this fabric will look nice.


Let's do a tree this time.


Normal pencil works on this one.  Make sure you mark on the back of the fabric.


Cut it out...


And glue it!  I like this one much better!


I've found that when I'm gluing the cards, the glue tends to make the card-stock bend.  Find the heaviest book you own and plop it down on top of the cards so they dry flat.  Here, this one will do!

Is this not the biggest book you've ever seen in your life?

After doing this, I went "OHH, I've got some leftover Christmas fabric in the bottom of that drawer!", like most people would say.  Let's repeat this process with actual Christmas fabric:


And here's the final product again!  Make sure you add text and decorate the insides accordingly.  CUUUTE! And SO easy!


If you liked this or you have some of your own DIY Christmas card ideas, let me know in the comments!  And don't forget to follow me on Facebook and Twitter!


Friday, December 7, 2012

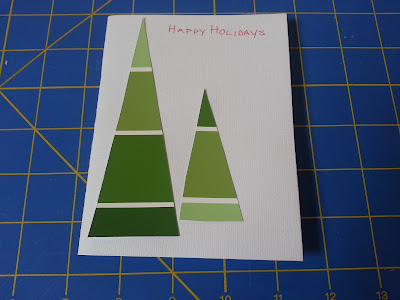
How to make: Paint Chip Tree Christmas Cards

Holiday/Christmas Card Tutorial #2!  Yes, I'm getting another craft up on my food/CRAFT blog!  :)  You must excuse me, I'm also trying to write/finish my Master's Thesis this month.  Good thing this is a really really easy way to make fast and adorable Holiday cards.  All you have to do, really, is go to a store with paint and pick up a few "paint chips" those sample color cards that they have on display for you to take.

I went to my local store and picked out a couple of color options:  (Psst, we're making trees)


 Then I cut my card stock again to make the "base" of my cards.  See my Frankencards for more info on this.


Now start making "tree" shapes out of the paint chips, paying attention to where the different colors lie in the triangle.  I measured this to be two inches on the bottom.


Just like this!


Flip it over and cut smaller trees from the other direction of colors, and repeat:


Then put it on your card stock!  ...Uhhh Whoops!  Time to re-cut! :)  You can cut out bigger card stock to avoid this happening.  And THAT's why we measure, Laurie, instead of cutting free-form.


 Oh well, it all worked, out, see?  I decided on two trees because my cards were kind of small.


Get your glue going now:


Add some text, and you're done!!


If you liked this or you have some of your own DIY Christmas card ideas, let me know in the comments!  And don't forget to follow me on Facebook and Twitter!

Tuesday, December 4, 2012

How to make: "Frankencard" Christmas Cards

It's December!  My favorite time of the year!  I decided to get a jump on my Christmas cards this year.  The past couple of years I've been making my own Christmas cards, as well as cards for many other occasions.  I have all the tools around to make cute cards, and it's not difficult to get creative and make custom cards for people!  Not to mention all the money you save after the initial investment in some card stock and other materials.  When you think about it, I recently picked up a package of white card stock at Jo Ann's for about $3 on sale, and most cards these days would cost about that much or more!

The past 10 years or so I've been collecting a multitude of Christmas cards.  This is due to me buying a pack of cards and then not sending them all out. (Whatever, I'm unpopular or something) I'd either send out the same cards the next year or just hang on to them.  Not to mention the stock-pile of cards I've gotten from other people this time as well.  (I'm a card-hoarder, of sorts)

For example, this particular card I sent out numerous times during my early 20's.  My friend Lori, who is the Martha Stewart of Christmas cards, once said something like, "Laurie, you sent me this card already!!!"   I may have sent them out like three years in a row.  AND LOOK, I STILL HAVE SOME LEFT OVER!  I must have gotten a 30 pack or something!


So in light of the stock-pile of cards I own that I have no use for, I had the idea to use the cards I already had to make new Christmas cards!

Begin by making "cards" out of your card stock.  This consists of cutting it in half and then folding the two pieces in half.


Go ahead and start cutting those cards into pieces.  If you have an issue with cutting up cards other people have sent you, then just stick with your leftover cards from the past.


Then, all you've gotta do it glue those pieces onto the front of the card in cute and interesting ways.  Using different kinds of angles will make it visually interesting.  Here's a finished product.


I made a couple of cards from the pieces that I had cut out:


For the insides, you can either cut and paste the greeting from the insides of the old cards, or write your own message.  Cute, right?  Your very own "Frankencards"!


If you liked this or you have some of your own DIY Christmas card ideas, let me know in the comments!  And don't forget to follow me on Facebook and Twitter!