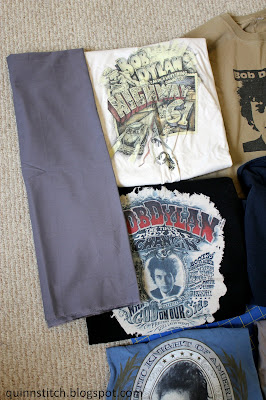
I was commissioned by my friend Lori over at FoxesLoveLemons to make a special birthday present for her mom, Jan. Now Jan has been a very big Bob Dylan fan for a long time, and over the years she has accumulated quite a few t-shirts from various concerts. Jan decided that she'd like to take all these t-shirts and turn them into a nice throw for her to sit under during the winter months. Naturally, this is such a great idea! Turning something you love into something else, to increase the use you can get out of it!
Now, I am attempting to be very careful with this project, as some of these shirts are no doubt vintage, and I won't be able to make any cutting mistakes. So, I am taking no chances and setting this up properly. I have to decide on the size of the squares of the t-shirts, the design of the border, the colors of the accent fabrics, and the placement of the t-shirts. Just roughly setting the t-shirts down into squares, I get something like this:
As you can see, there is a variety of shapes, sizes, colors, and designs that I am working with. It's important to arrange these out so there's a balance to all of this. Most notably, I believe the colors should be balanced, with the white shirts on opposite sides, the brown shirts on opposite sides, and the two darkest shirts on opposite sides. This placement will most likely be changed around until I'm happy with the final balance. I'm really liking the starburst pattern with just the words "Bob Dylan" in the middle. It's so simple and symmetrical. Plus, there is really no other shirt like it in the bunch, in terms of design, so it will do well by itself in the middle.
In addition, I need to decide on accent colors for the sides and back of the quilt. I was envisioning a neutral gray for the back and border. I'm playing with possibly adding a strip of cream fabric between the t-shirts and the gray border (or maybe in between the shirts). These are all things that need to be decided!
Here's a rough vision of those two options:

|

|
I need to gather the things I'm going to need for this project:
Materials
2 yards accent fabric (gray)
1-1½ yards border fabric (cream, optional)
matching thread (gray & cream)
1-2 yards lightweight interfacing
sewing machine
fabric scissors
cutting mat
rotary cutter
yard stick
measuring tape
quilter's stencil plastic (to make stencils)
needles
Now Jan originally wanted the quilt to be 28" x 48", but looking at the design of the t-shirts, the minimum width could be no less than 40". Here's a rough plan of what it should look like:
Now it's time to make the hard decisions, wo(man) up, and start cutting into these t-shirts!
Make sure to check back weekly on Wednesdays, I'll be posting updates about this project! And as always, Thanks so much for visiting. I really appreciate everyone who reads and comments. If you like what you've seen here, please follow me on Facebook and Pinterest to receive updates.


Oh my gosh, I'm SO excited. I love that I'll get to follow along with the project I'm commissioning :)
ReplyDeleteI hadn't thought about the cream border previously, but I think it looks really great. As long as it doesn't make it too much bigger than the size my Mom originally wanted, because apparently she's particular about blanket size. hahahaha. So weird.
I personally LOVE the way you have the shirts set up, but I think she requested no white shirts in the top row? Is that possible? Probably in case there's an errant tea spill or something, the ones in the top row would be the first to get hit. (I'm assuming that's the reasoning for this strange request).
You're going to do such a great job with this! I'm so lucky to have a friend like you!
Ahh, yes I remember that now! Yeah I'm still messing around with the placement of the shirts! :)
Delete